Making a DIY fall wreath is a fun and engaging way to bring the autumn vibe into your home. All you need are some basic supplies such as a wreath base, seasonal decorations, and a glue gun. This project not only adds a personalized touch to your decor, but it also provides a rewarding crafting experience. With simple and clear steps, you can make a beautiful fall wreath that suits your style and space.
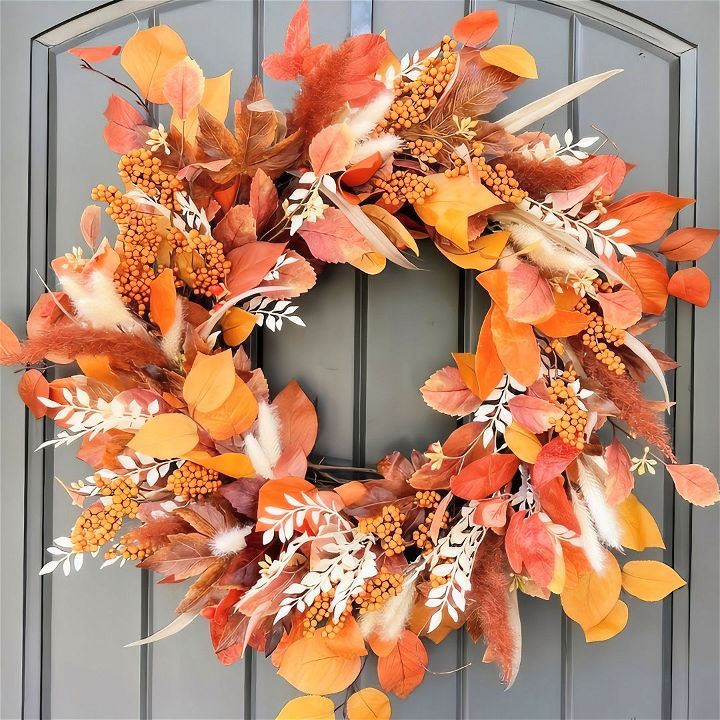
To get started, choose a theme that reflects your personality and the colors of fall. You can use items like pinecones, leaves, and berries to adorn your wreath. Following a step-by-step guide ensures that everything comes together smoothly. Next, pick durable materials to make your creation last throughout the season.
Materials You'll Need
1. 14-inch Grapevine Wreath
I prefer starting with a 14-inch grapevine wreath as it's a manageable size for most doors. Adjust the amount of materials if you choose a different size.
2. Hot Glue Gun and Glue Sticks
A reliable hot glue gun is essential for securing your foliage and embellishments to the wreath base.
3. Wire Cutters
Good quality wire cutters will help you trim stems and materials to the perfect size.
4. Orange Leaves
Orange leaves add vibrant color. I found mine at Hobby Lobby.
5. Mixed Foliage Picks
I have a mix of fall foliage I bought wholesale, including leaves and berries. This variety adds beautiful texture and depth.
6. Sorghum Grasses
These rich, rust-colored grasses are one of my favorites for fall decor.
7. Brown Fall Leaves and Maple Leaves
Adding different shades of brown and varied leaf types brings in a natural look.
8. Ruscus
For a touch of brightness, I use ruscus from Michael’s spring collection, bought on clearance.
9. Orange Berries
These add a lovely, bright touch.
10. Bunny Tails
For added texture, bunny tails are perfect.
Step by Step Instructions
Discover easy step by step instructions for DIY fall wreath. Make stunning fall decorations with our simple, guided tutorial!
Step 1: Prepare Your Materials
First, gather all your materials in one place. Cut your mixed foliage and orange leaves into smaller, more manageable pieces with your wire cutters. This step ensures that everything is ready to use as you start assembling the wreath.
Step 2: Base Layer - Orange Leaves
Start by adding your base layer of orange leaves around the grapevine wreath. Apply hot glue to the stems and press them along the grain of the grapevine. Cover both the inside and outside edges.
Step 3: Add Mixed Foliage
Next, incorporate your mixed foliage picks. Secure these in various spots around the entire wreath for a fuller look. The different textures from these picks will add a dynamic element to the wreath.
Step 4: Insert Brown Leaves and Maple Leaves
Cut the brown leaves into smaller sections. Distribute them evenly around the wreath to avoid any clumps, maintaining a balanced appearance. Do the same with the maple leaves.
Step 5: Incorporate Sorghum Grasses
The sorghum grasses come next. They bring a pop of that rich rust color. Space them out evenly around the wreath, securing them with hot glue.
Step 6: Add Ruscus
Now, add the ruscus for a touch of brightness. This foliage’s lighter color will contrast nicely with the darker elements, bringing the whole wreath to life.
Step 7: Incorporate Orange Berries
Orange berries are super fun and enhance the wreath's vibrancy. Since the picks often come with multiple stems, cut each pick into smaller sections and add them throughout your wreath.
Step 8: Add Bunny Tails for Texture
Finally, the bunny tails provide a fantastic textural element. Cut them into smaller sections, just as you did with the other foliage. Distribute them evenly around the wreath, mixing the lighter and darker bunny tails.
Step 9: Finishing Touches
Take a step back and look at your wreath. Fill in any gaps with leftover foliage or berries. Ensure that everything is securely glued in place and balanced in appearance.
Step 10: Hang and Enjoy
Your vibrant fall wreath is now ready! Find the perfect spot on your front door or a wall where you can admire your handiwork.

Tips and Tricks
Discover essential Tips and Tricks to boost productivity, streamline tasks, and improve efficiency in your daily routine.
Tip 1: Shopping for Supplies
Check for out-of-season sales. I got my ruscus from the spring collection on clearance, which saved money and added a unique touch to my fall wreath.
Tip 2: Using Leftovers
Save leftover pieces for future wreath projects. Extra picks from this wreath can be used in another project.
Tip 3: Balance and Symmetry
While adding foliage and embellishments, regularly step back to check the overall balance. This habit will help you create a well-proportioned wreath.
Making a beautiful fall wreath is a fun and creative way to welcome the new season. By following these steps and tips, you can make your own high-end wreath that not only looks fantastic but also provides a personal touch to your home decor.
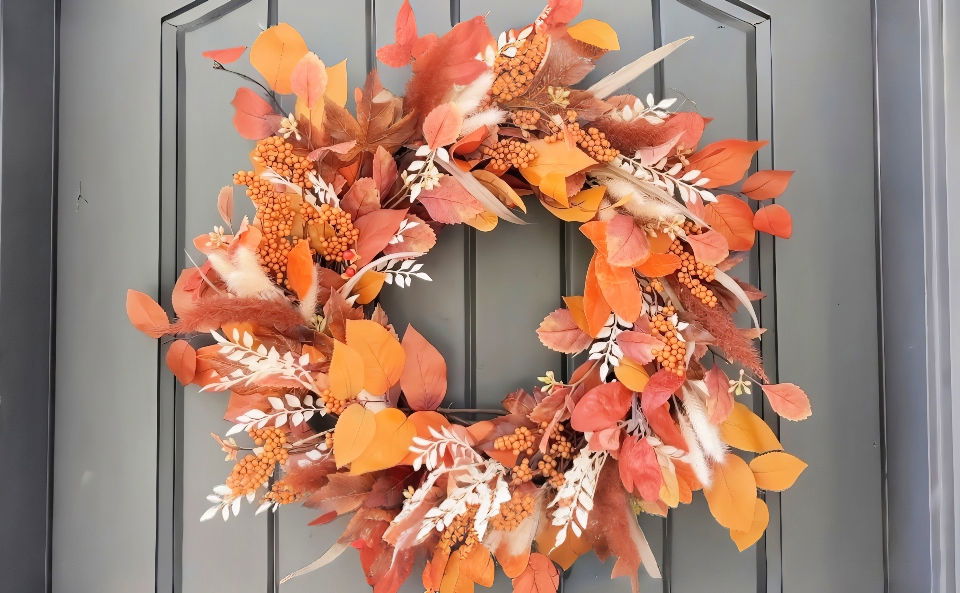
Thank you so much for joining me in this DIY tutorial. I hope you enjoyed making your vibrant fall wreath and feel proud of your beautifully crafted creation. For more wreath-making supplies, check out the free cheat sheet linked in the description of my video. Don’t forget to subscribe to my channel for more crafting tutorials. Happy crafting!
FAQs About DIY Fall Wreath
Get all your questions answered about DIY fall wreaths! Discover tips, materials, and creative ideas in our comprehensive faqs guide.
Consider using unique materials like corn husks, burlap, or even real fall foliage for a natural look. Adding unexpected colors or textures can give your wreath a modern twist. Check out various tutorials for inspiration.
Your front door is a classic spot, welcoming guests with seasonal cheer. However, don’t limit yourself; hang your wreath over a mantel, on a living room wall, or even in a window to add a touch of autumn indoors.
Absolutely! There are many simple tutorials available that require minimal skills and tools. Look for designs that use pre-made elements or easy-to-handle materials like felt leaves or paper.
To keep your wreath looking fresh year after year, store it in a cool, dry place when not in use. Wrap it in a plastic bag or tissue paper to protect it from dust and moisture. If you’ve used real foliage, consider replacing it each year for the best appearance.
The size of your wreath should complement where you plan to display it. For a front door, a wreath that is 22-24 inches in diameter generally works well. If you’re placing it on a large wall or over a mantel, consider a larger size for more impact. For smaller spaces, such as windows or apartment doors, a smaller wreath of about 16-20 inches might be more appropriate.
Conclusion:
In conclusion, making a DIY fall wreath is a fun and rewarding project that adds a personal touch to your seasonal decor. It’s easy to customize with your favorite autumn elements and brings a cozy vibe to your home. Use natural materials and vibrant fall colors to make your wreath stand out. Make your autumn unforgettable with a unique DIY fall wreath that showcases your creativity and love for the season.
Related DIY Projects and Ideas:
Discover exciting DIY projects and ideas related to your next creative endeavor. Get inspired with unique and easy-to-follow projects today!
- DIY 4th of July Wreath: Create a festive 4th of July wreath in minutes with these easy DIY ideas. Celebrate in style!
- Easy Wood Burning: Discover simple wood burning technique and pattern perfect for beginners. Start your creative journey today!
- Burlap Wreath: Learn how to make a beautiful burlap wreath at home with our step-by-step guide. Perfect for any occasion!
- DIY Faux Fireplace: Build a stylish faux fireplace on a budget with this DIY idea. Enhance your home's ambiance effortlessly!
- DIY Welcome Sign: Craft a unique DIY welcome sign to greet your guests with style. Get inspired with our creative ideas!


