Making your own DIY succulent planter is a fun and rewarding project. With the right materials and some creativity, you can craft beautiful and unique planters for your home or office. Succulents are easy to care for, making them perfect for anyone wanting to add some green to their space without the hassle of high-maintenance plants.
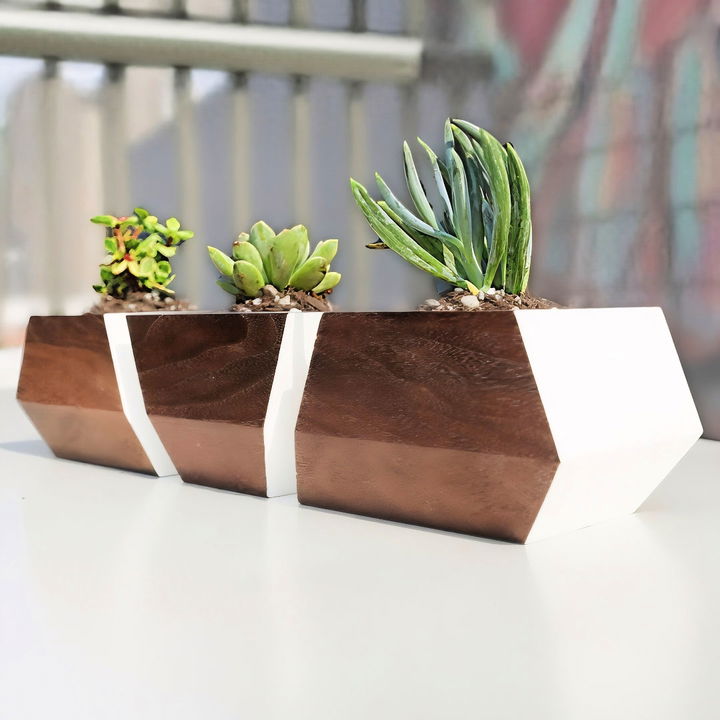
In this guide, you'll find step-by-step instructions on how to make a DIY succulent planter. From choosing the right soil and container to planting and caring for your succulents, we've got you covered.
Materials You'll Need
Before we get started, let’s gather all the materials. Here’s a quick rundown of what you’ll need and why:
- 3-inch pen turning blanks: These are the wooden blocks we will shape into our succulent planters. You can easily find them on eBay or at your local lumber store.
- Steel condiment containers: Available on Amazon, these will be used to hold the soil and plants inside the wooden planters.
- Spray paint of your choice: This is for adding a pop of color to your planters.
- Painter's tape: To cover parts of the wood we don't want to paint.
- Fine finishing blade and miter saw: For making precise cuts. This reduces the need for sanding.
- Forstner bit (2 and 3/8 inch): For drilling the exact size hole needed to fit the condiment containers.
- Drill press: For drilling clean, precise holes.
- Soft foam sanding pads: For sanding without rounding off the sharp edges.
Step-by-Step Instructions
Make a handmade masterpiece with our step-by-step DIY succulent planter guide. From wood prep to planting, we walk you through each step.
Step 1: Prepare the Wood
Start by ensuring your wood blocks are squared up. If you purchase rough cut blanks like I did, you’ll need to run them through a planer. If you don't have a planer, look for lumber marked as S3S or S4S, which means they have been squared up at the lumberyard.
Step 2: Make the Angular Bevel Cuts
Set up your miter saw with a fine finishing blade for clean cuts. Square up the ends of the block using the miter saw, which is crucial for drawing accurate guidelines. Next, sketch the guidelines for the bevel cuts on the ends of the block.
Move on to making the long bevel cuts along the sides of the block. If you don’t have a miter saw, a table saw with a miter sled works perfectly. Adjust the angle until it looks appealing to you; there are no hard and fast rules here.
Step 3: Split the Block into Planters
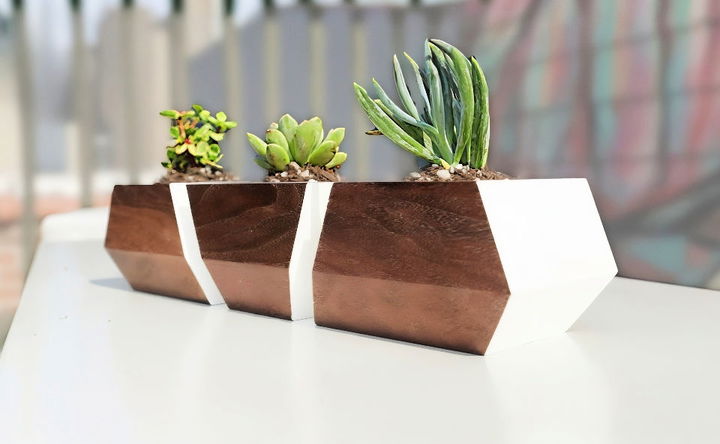
After the bevel cuts, you'll need to split the block into three separate planters. Again, the angles aren’t specific; just create shapes that appeal to your eye. However, ensure you leave enough space at the top to drill a 2 and 3/8 inch hole for the steel container.
Step 4: Drill the Holes for the Containers
Find the center point on the top of each piece to drill the hole for the steel plant container. Using the Forstner bit on a drill press creates a perfectly sized hole. This step is surprisingly satisfying due to the sizable, conical shavings produced.
Step 5: Sanding the Planters
Sanding is a critical step. To keep the edges sharp and the geometric shape intact, avoid using random orbit or other power sanders. Instead, use soft foam sanding pads. Sand the visible raw wood sides up to a very fine grit, and the sides to be painted with just a fine grit to provide texture for the paint to grip.
Step 6: Painting the Planters
Cover the surfaces you don’t want to paint with painter’s tape. Take your planters outside and spray paint them. I used Plutonium spray paint for its thick application and strong pigmentation. It’s better suited for small projects like this. On my spalted maple set and one walnut set, I chose white, and for the other walnut set, I used a yellowish-orange spray paint.
Step 7: Applying the Finish
For the walnut planters, I used paste finishing wax to maintain their natural color. For the maple planters, which I wanted to darken and highlight the grain, I used an oil-based finish called Maker Brand Simple Finish. Let the finish dry completely.
Optional Step: Designing a Planter Liner
While waiting for the finish to dry, I experimented with designing a simple planter liner in Fusion 360 and printed it out with my 3D printer. This is optional but a fun and rewarding extra step if you have a 3D printer.
Step 8: Planting the Succulents
Once everything is dry, insert the steel containers into the holes and add your succulents. And voila, you have beautiful, modern geometric planters ready to brighten up your space!
This project was inspired by the requests from viewers like you. I originally bought similar planters on Etsy, but when they were no longer available, I decided to reverse-engineer them and make my own. This project is straightforward and can be completed in about a day.
FAQs About DIY Succulent Planter
Explore faqs about DIY succulent planters. Discover tips, materials, and care for creating your own stunning succulent displays at home.
Select a container that has one or more drainage holes to prevent water from pooling at the bottom, which can cause root rot. The size of the container should be slightly larger than the root ball of your succulents. You can use various materials like ceramic, wood, or even repurposed items like old tins or pallet wood.
Succulents need to be watered differently than other plants. Wait until the soil is completely dry before watering again. This could be once a week or less, depending on the climate and indoor conditions. Overwatering is a common mistake, so ensure the soil has dried out fully.
Yes, you can place your succulent planter outdoors, but make sure it’s in a spot that receives partial shade or indirect sunlight. Succulents thrive in bright light but can be damaged by intense direct sunlight. Also, bring them indoors during extreme weather conditions to protect them.
Use a well-draining potting mix designed for succulents and cacti. These mixes usually contain a combination of soil, sand, and perlite or pumice, which helps prevent water retention and provides the right environment for succulent roots to grow.
Proper drainage is crucial for the health of succulents, as they are prone to root rot if the soil stays wet for too long. To ensure proper drainage:
Use a container with drainage holes at the bottom.
Place a layer of gravel or broken pottery at the bottom of the planter before adding soil.
Consider using a potting mix specifically designed for succulents and cacti, which typically includes sand and perlite to increase drainage.
If using a decorative container without drainage holes, be very cautious with watering, and consider planting the succulents in a smaller pot with drainage holes that can sit inside the decorative one.
Conclusion:
In conclusion, making a DIY succulent planter is a fun and rewarding project. It not only personalizes your space but also adds a touch of nature to your home. Gather your materials, follow the steps, and enjoy the process of building your succulent masterpiece.
Related DIY Projects and Ideas:
Discover creative DIY projects and ideas for your home. Get inspired with easy-to-follow tutorials and fun, cost-effective crafts.
- DIY Console Table: Maximize space and style with this adorable DIY console table plan. Perfect for any entryway!
- DIY Tufted Headboard: Upgrade your bed design with a simple DIY tufted headboard. Easy and stylish!
- DIY Macrame Plant Hanger: Create an easy macrame plant hanger with these easy patterns. Perfect for any space!
- DIY Faux Fireplace: Add warmth and charm on a dime with a DIY faux fireplace. Stylish and budget-friendly!
- DIY Welcome Sign: Greet guests in style with this wonderful DIY welcome sign idea. Personalize your entryway easily!

