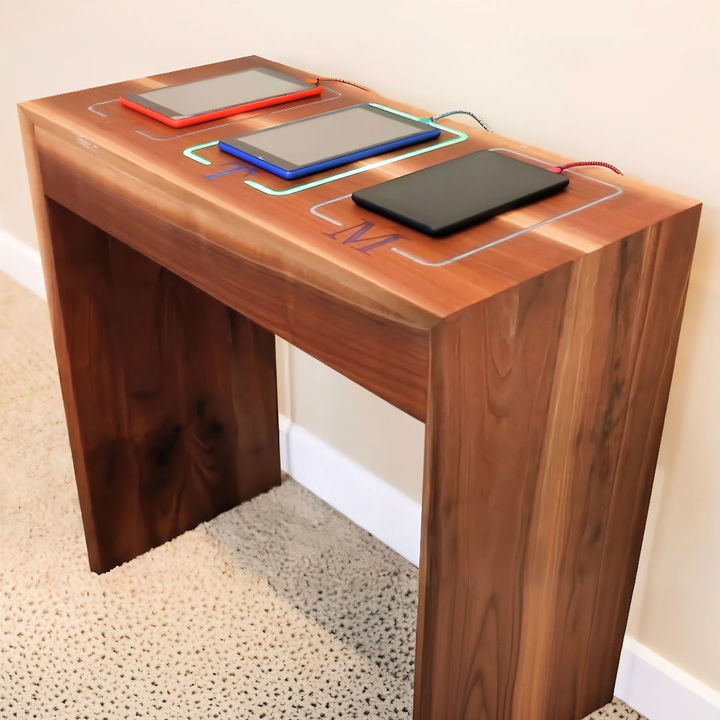
Building a DIY charging station can simplify your life by keeping all your electronic devices in one organized spot. It's a practical solution for managing multiple gadgets, from smartphones to tablets. A charging station helps avoid tangled cables and cluttered spaces, making it easier to keep your technology charged and ready to use. By building your own, you can customize it to perfectly fit your needs and style.
The process is straightforward and rewarding. With some basic materials and tools, you can craft a functional and stylish DIY charging station. This project is great for those who love hands-on activities and enjoy adding a personal touch to their space. Ready to get organized and explore the step-by-step guide on how to make your own charging station? The next section will walk you through the essentials and tips to ensure success.
Gather Your Materials
Before diving into the project, let's list the essential materials and tools I used:
- Walnut Boards: Adds a rich, decorative look. I selected less-than-perfect boards that needed some care.
- Planer and Jointer: For flattening and preparing the wood.
- CNC Machine with Router Bits: Used for precise carving and creating grooves for LEDs.
- Epoxy Resin and Pigments: Fills grooves and diffuses LED light.
- LED Strips and Arduino Uno: Core of the smart notification system.
- USB Charging Ports: Ensures multiple device charging.
- Clamps, Sandpaper, Tape, Glue: Various assembly and finishing tasks.
Step by Step Instructions
Learn how to build a DIY charging station with step-by-step instructions, from preparing walnut boards to electronics and final assembly.
Step 1: Preparing the Walnut Boards
To start, I pulled out walnut boards that had been collecting dust in my shop. These boards were rough and needed a lot of milling.
Milling the Boards
- Planing: Used a planer to flatten both sides of each board and reveal the beautiful grain underneath. This step is crucial for a smooth finish.
- Jointing: Jointed the edges to ensure they were square.
- Ripping to Size: After jointing, I ripped the boards to uniform widths using my table saw. This ensures the boards fit together seamlessly.
Step 2: Creating Panels with Miter Joints
I needed three panels for the charging station, joined together with miter joints, which are both strong and visually appealing.
Gluing Up Panels
- Orientation Check: Arranged the boards carefully to ensure the grain and light sapwood streaks lined up as desired. This step is like choosing matching socks—essential for a polished look.
- Gluing: Clamped the boards together after applying wood glue. The key here is patience and ensuring no gaps are left.
- Sanding: Once the glue dried, I used a drum sander to flatten any unevenness.
Step 3: Adding Individual Charging Slots
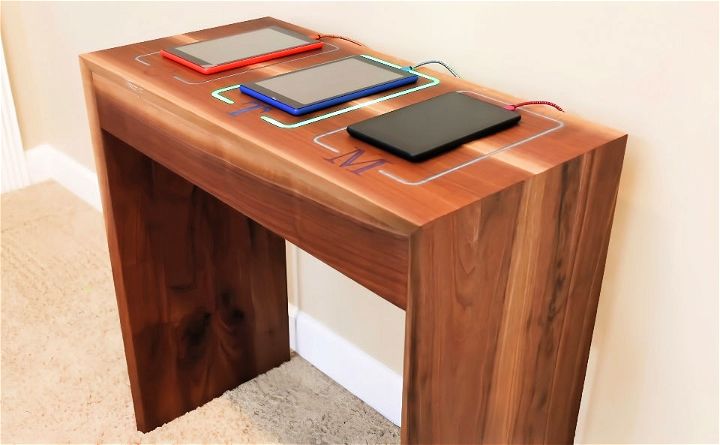
I wanted each of my kids to have their designated charging slots, personalized with their initials.
Designing with CNC
- Graphic Design: Designed the layout in the Easel software.
- CNC Carving: Routed out grooves for the charging slots and initials using a quarter-inch carbide spiral bit. Then, I switched to a 60-degree V bit for clean, detailed cuts.
Step 4: Filling Grooves with Epoxy
Epoxy not only enhances the aesthetic but also serves a functional purpose by diffusing LED light.
Epoxy Work
- Tape and Leveling: Taped off the grooves and ensured the surface was level for an even pour.
- Mixing and Pouring: Mixed high-performance epoxy with white pigment and poured it into the grooves.
- Curing: Allowed the epoxy to cure for about six hours.
Adding Colors
- Initials: Used colored pigments (orange, blue, purple) in epoxy to fill in the carved initials, making them fun and distinctive.
- Sanding: After curing, sanded the epoxy letters to ensure a smooth surface.
Step 5: Constructing the Charging Station
The next step is assembling the panels and adding some decorative touches.
Cutting and Assembling
- Chamfer Cuts: Tilted the table saw to create chamfered edges on the panels for a sleek look.
- Miter Cuts: Used my table saw sled to make precise 45-degree miter cuts on the panels.
- Glue-Up: Taped and clamped the miter joints tightly to ensure a strong bond.
Step 6: Applying Finish
A good finish brings out the beauty of the wood and protects it.
Finishing Touches
- Oil Finish: Sanded up to 150 grit and applied a two-part oil finish. The oil penetrates deep, enhancing the walnut’s natural color.
- Epoxy Surface: Used a squeegee and white scotch-brite pad to evenly distribute the finish on the epoxy.
Step 7: Electronics and Arduino Coding
Here’s where it gets smart.
Setting Up the LEDs
- Placing LEDs: Glued LED strips into the epoxy grooves, ensuring they were secure and evenly spaced.
- Wiring: Used a USB block to power the LEDs and connected current and voltage sensors to monitor charging status.
- Arduino Coding: Programmed the Arduino Uno to control the LEDs. While I faced some challenges, I managed to get basic functionality—LEDs pulse when charging and turn solid when fully charged.
Step 8: Final Assembly and Testing
The moment of truth—bringing everything together.
Assembling Components
- Installing the Back: Attached the back panel with space for cords and ventilation.
- Cable Management: Used cable clips and Velcro to manage the USB block and prevent cables from detaching.
Testing the System
- LED Functionality: Ensured that each slot’s LED correctly responded to the tablet’s charging status. Despite some hiccups, the basic functionality worked.
Lessons Learned
- Preparation is Key: Properly plan and test each step to avoid mishaps.
- Learning New Skills: Experimentation is part of the DIY journey. Even if you fail, every step is a learning opportunity.
- Persistence: Challenges like coding and electronics may seem daunting, but with persistence, you can achieve your goals.
Building this smart charging station was a fulfilling experience. Not only did it solve my scattered tablet charging issues, but it also provided a chance to learn and refine new skills. If you're inspired to try this at home, remember that patience and persistence are your best tools.
FAQs About DIY Charging Station
Find answers to common questions about DIY charging stations. Learn about setup, safety, materials, and more to power up your devices efficiently.
Begin by deciding the size of your box based on your charging needs. Cut the oak plywood and boards to the required dimensions. Use hot glue to attach the sides of the box to the base, and reinforce with nails if needed. Add internal support by gluing wooden dowel pieces inside the box.
Mark the position for your wireless charger on the lid and use a router to create a recess, ensuring it’s not too deep. Route a channel for the charger’s cable for easy connection. Attach half-inch boards on the top side with hot glue to act as device supports, and apply edge banding for a polished look.
Absolutely! You can stain the wood to your preferred color and apply a sealant for protection. Additionally, you can drill holes on the side for cords to thread through, with one larger hole for the power strip cord and others for additional cables. This allows you to customize the look and functionality of your charging station.
Always test your charging station before regular use. Make sure all electrical connections are secure and that the power strip is properly installed. If you’re using a weatherproof enclosure, ensure it’s rated for the environment where you’ll place the charging station. Regularly inspect your station for any signs of wear or damage.
To make your charging station eco-friendly, consider using sustainable materials like bamboo or reclaimed wood. You can also power it with a solar panel to reduce energy consumption. Ensure that the power strip you choose is energy-efficient and has an auto-off function to save power when not in use. For those interested in tech integration, adding a battery management system can optimize charging efficiency and prolong battery life.
Conclusion:
In conclusion, assembling a DIY charging station is a rewarding and practical project. It streamlines your charging needs and keeps your space organized. With a few simple materials and tools, you can create a station that suits your style. Whether it's for your home or office, this project is sure to make a difference. Enjoy the convenience and neatness it brings!
Related DIY Projects and Ideas:
Discover creative DIY projects and ideas for all skill levels. Transform your space with easy and fun at-home craft ideas.
- DIY Magnetic Board: Organize your space with a DIY magnetic board. Perfect for notes, photos, and more.
- DIY Fog Machine: Create an amazing party atmosphere with this DIY fog machine idea. Perfect for adding a spooky or dramatic effect.
- DIY Tablet Stand: Discover 3 different ways to make a DIY tablet stand and enjoy hands-free convenience with your device.
- Build a Subwoofer Box: Learn how to build a subwoofer box for perfect sound quality in your car or home audio system.
- DIY Epoxy Countertops: Transform your kitchen or bathroom with DIY epoxy countertops that look stunning and are durable.

