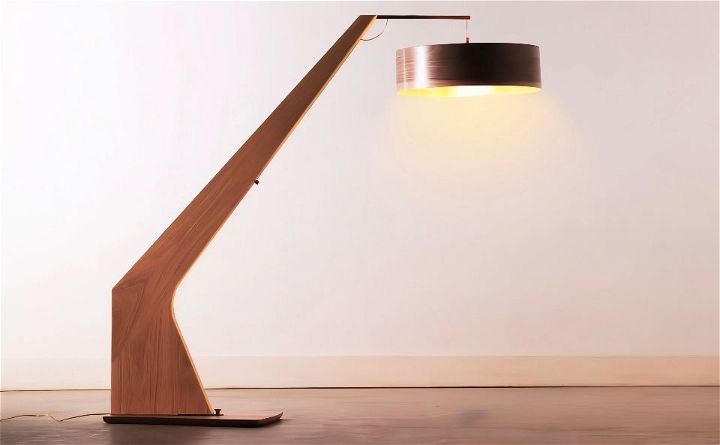
Making a DIY floor lamp can be a rewarding project that combines creativity and practicality. This guide offers simple steps and helpful tips to craft a one-of-a-kind floor lamp at home. Using materials like wood, metal, or repurposed items, you can design a lamp that not only lights up your space but also complements your decor. Follow along to learn the basics of making a safe and unique floor lamp.
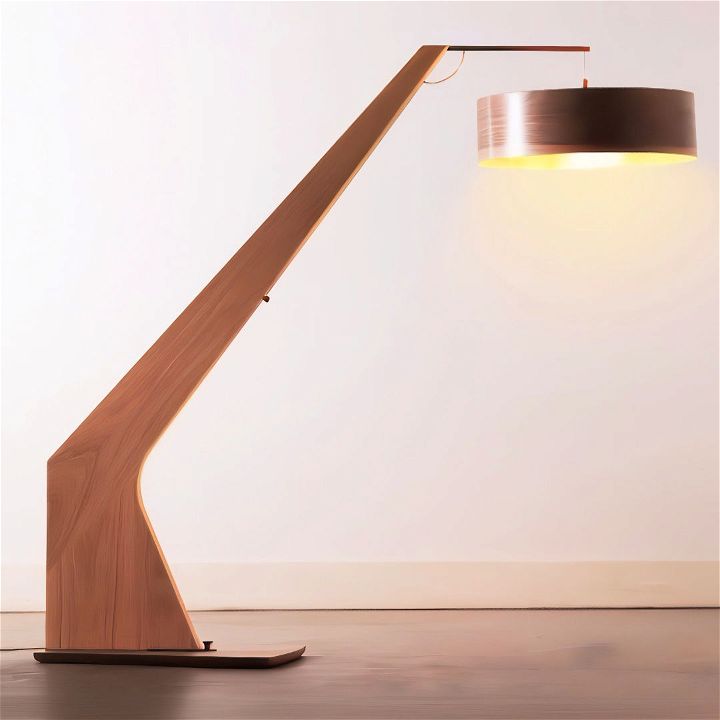
Building your floor lamp allows you to tailor it to your style and needs. From choosing the base to selecting the lampshade, the choices are endless. This creative project is great for personalizing your living space and showcasing your skills.
Materials and Tools Needed
Before diving into the steps, let’s go through the materials and tools necessary for this project. Each item plays a crucial role in bringing the lamp to life.
Materials
- White Oak Board: This sturdy hardwood is my go-to for the lamp’s main structure.
- Five-Quarter White Oak Panel: Used for the base, providing strength and stability.
- Brass Plates: These add an elegant touch and are used for various accents.
- Brass Square Rod: Supports the lamp shade and bulb.
- Walnut Veneer: This adds contrast to the lampshade.
- Lamp Socket and Bulb: Essential for functionality.
- Dimmer Switch and Knob: To adjust the lighting intensity.
- Wood Glue and Clamps: For assembling the wooden pieces.
- Felt Pads: Ensures smooth swivel action.
Tools
- Table Saw: For precise cuts.
- Router and Router Table: Essential for grooving and shaping.
- Band Saw: For rough cutting the wood.
- Track Saw: Helps in cutting straight lines.
- CNC Machine: Used for intricate cutting, especially brass.
- Drill and Drill Bits: Necessary for wiring and assembly.
- Clamps: To hold pieces together while gluing.
- Sander: For a smooth finish.
Step-by-Step Guide to Building the Lamp
Discover our step-by-step guide to building the lamp, complete with detailed instructions and tips for a perfect DIY project.
Step 1: Preparing the Main Arm
Start with a solid piece of eight-quarter white oak. This will be cut down to form the main arm and lower vertical section of the lamp. Mark out your parts directly on the wood. I skipped using a template for this project since I wanted to play around with the design.
- Cutting the Pieces: Begin by rough-cutting the sections using a band saw. Make precise edges with a table saw and a track saw.
- Jointing the Faces: Use the table saw to make sure the joint faces are smooth and even.
Step 2: Building the Groove for the Brass Rod
Before gluing the two main sections together, you’ll need to cut a groove at the top of the upper arm for the brass rod, which will hold the bulb and lampshade.
- Router Jig Setup: Make a router jig to ensure the groove is centered.
- Cutting the Groove: Make the cut carefully and ensure it is clean and centered.
Step 3: Attaching the Brass Plate
The lower brass plate is for the swivel mechanism at the base.
- Shaping the Brass Plate: Cut and shape the brass plate to fit.
- Recessing the Brass Plate: Cut a shallow recess into the lower vertical section so the plate sits flush.
Step 4: Assembly of the Main Arm
With individual components prepared, it’s time to glue the sections together using wood glue and clamps.
- Dry Fit First: Ensure everything fits properly before applying glue.
- Applying Glue and Clamping: Apply glue, fit the sections together, and use clamps to hold them in place until the glue dries.
Step 5: Building the Base
Now focus on the base, which should be robust enough to support the lamp.
- Glue Up the Panel: Laminate the five-quarter white oak panels to the required width.
- Cutting the Shape: Mark out and cut the shape of the base. The dimensions are largely customizable.
- Making the Swivel Mechanism: Cut an arc into the base. This mechanism allows the lamp to swivel and can be locked in place.
Step 6: Crafting the Lampshade
For the lampshade, I chose to use walnut veneer for a nice contrast against the white oak.
- Cutting the Veneer: Cut a strip of walnut veneer and sand it down to the desired thickness.
- Preparing the Frame: Use a CNC machine to cut the frame for the lampshade. The design should comfortably hold the bulb socket.
- Assembling the Shade: Glue the veneer onto the frame and allow it to dry.
Step 7: Wiring the Lamp
Wiring is a crucial part of the lamp, facilitating its functionality.
- Drilling Holes: Drill small holes for the wire to pass through the lamp arm into the base.
- Running the Wire: Feed the wire from the top where the bulb will be down through the arm and into the base.
- Inserting the Dimmer Switch: Make a recess for the dimmer switch on the lamp arm. Feed the wire through and connect it to the switch.
Step 8: Final Assembly and Finishing Touches
With everything wired and assembled, it’s time for the finishing touches.
- Covering the Wires: Use strips of white oak to cover the wires running down the back of the lamp arm.
- Sanding: Sand the entire lamp to ensure it’s smooth and prepare it for finishing.
- Applying Finish: Use a roller to apply a protective finish. Be careful around the brass components.
- Adding Felt Pads: Attach felt pads to the bottom of the base for smooth swiveling.
Step 9: Testing Your Lamp
Finally, plug in your lamp and test it out. Adjusting the swivel mechanism, turn the dimmer switch, and enjoy the fruits of your labor.
FAQs About DIY Floor Lamp
Discover answers to common faqs about DIY floor lamps, including materials, steps, and design tips for making your own stylish lighting.
When choosing a lampshade, consider the material and shape that best suits your design vision. Materials can range from fabric to metal or glass, and shapes can vary from traditional drum to modern geometric styles. The lampshade should complement the base and fit the overall aesthetic of your room.
You’ll need a screwdriver, a drill, wire cutters and strippers, safety glasses, a measuring tape, and a level. These tools will help you assemble the parts securely, handle electrical components safely, and ensure your lamp stands straight and stable.
Absolutely! Customizing your lamp’s base is a great way to inject personality into your project. You can measure, cut, or shape materials like wood or metal to make a unique design. If you’re using wood, consider the grain and density for a natural look. Metal bases can be sleek and stylish, while ceramic or glass bases offer playful colors and textures.
Yes, making a floor lamp at home can be safe if you follow proper guidelines. Always ensure you’re using the correct wiring and components that meet safety standards. It’s important to conduct a final safety check before using your lamp to make sure all connections are secure and the lamp is stable.
Stability is key for any floor lamp to prevent tipping. Start by choosing a heavy and wide base that can support the lamp’s height and weight. Materials like wood, metal, or concrete are excellent choices for a sturdy foundation. When assembling, make sure all parts are tightly secured with screws or adhesives. Test the lamp by gently nudging it in different directions to ensure it doesn’t wobble or tip over. If necessary, add weight to the base or adjust the feet for even distribution.
Conclusion:
In conclusion, making your own DIY floor lamp is a rewarding and cost-effective project. It allows you to make a unique piece that fits your style and home decor perfectly. By following simple steps and using easily available materials, you can build a functional and stylish lamp. We hope this guide has inspired you to start your own diy floor lamp project and light up your space creatively.
Related DIY Projects and Ideas:
Discover innovative DIY projects and creative ideas to enhance your home and unleash your inner craftsman with related DIY projects and ideas.
- DIY Upholstered Headboard: Upgrade your bedroom with a wonderful DIY upholstered headboard. Stylish and easy-to-follow plans for a chic look.
- DIY Coffee Bar: Build your lovely DIY coffee bar with our beginner-friendly guide. Perfect for coffee lovers looking to personalize their space.
- DIY Changing Table: Build a practical DIY changing table with ease. Step-by-step instructions for a functional nursery addition.
- DIY Bed Frame: Create an adorable DIY bed frame on a budget. Easy and affordable plans to transform your bedroom.
- DIY Console Table: Maximize space and style with this delightful DIY console table. Find plans and tips to create the perfect entryway piece.

