Building a DIY teardrop trailer can be a rewarding project that showcases your creativity and craftsmanship. These small, compact trailers offer a cozy and efficient way to enjoy outdoor adventures. By building your own teardrop trailer, you can customize it to fit your specific needs and preferences. Plus, it's a fantastic opportunity to learn new skills and work with your hands.
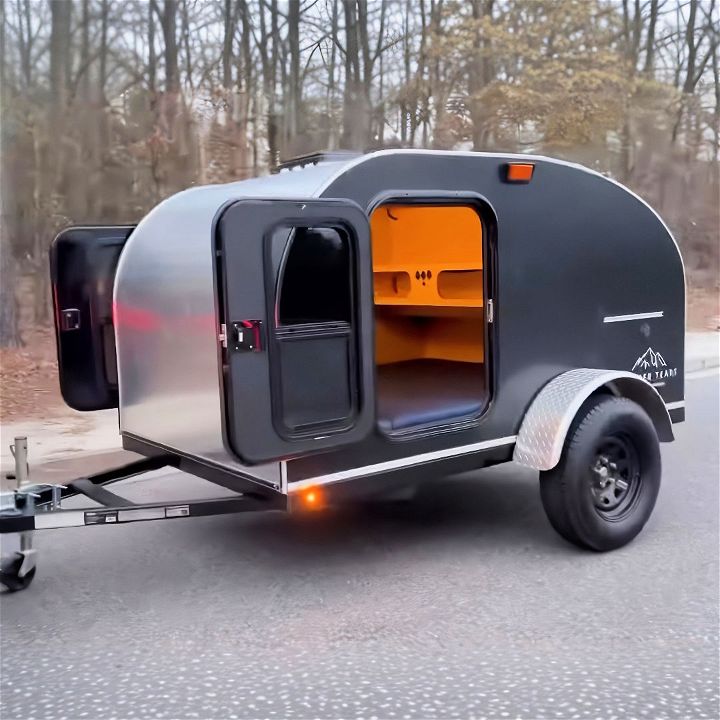
Starting with a solid plan and the right materials is crucial for success. Detailed instructions and guidelines can help simplify the process, even if you have limited experience with construction projects. Transforming raw materials into a functional and stylish teardrop trailer involves several steps, but with patience and careful attention to detail, you can achieve a fantastic result.
Ready to dive deeper into building your perfect DIY teardrop trailer? Explore the next section for practical tips and detailed instructions. This will help make your project more efficient and enjoyable.
Materials Needed
Let's start with the essential materials needed for this project. Each material serves a specific purpose and ensures the durability and functionality of your teardrop trailer.
- Trailer Frame: I used a Harbor Freight 5x8 Ironton trailer frame, modified with 2” spacers, 15” wheels, and an adjusted axle. This provides the base structure.
- Wood Panels: For the floor, walls, and roof. High-quality plywood is recommended for its strength.
- Insulation: Essential for temperature regulation inside the trailer.
- Aluminum Sheets: Used for the exterior cladding, making the trailer weather-proof.
- Hurricane Hinge, Edge Trim, and T-molding: Aluminum components that secure the roof and doors.
- Electrical Components: Includes the tongue box, Battle Born battery, 12v fuse block, master battery switch, vent fan, charging station, and reading lights.
- Miscellaneous Items: Such as the mattress, doors, and stove.
Step by Step Instructions
Discover step-by-step instructions for building your own DIY teardrop trailer, from floor to aluminum cladding, in easy-to-follow stages.
Step 1: Building the Floor
Materials Needed: Trailer frame, wood panels, screws, and insulation.
- Prep the Trailer Frame: Assemble the trailer frame according to the manufacturer’s instructions. Ensure that all parts are tightly secured.
- Install the Floor Panels: Cut the plywood to fit the trailer frame. Secure the panels using screws, ensuring a snug fit.
- Insulate the Floor: Place insulation between the wood panels for better temperature control.
- Secure the Top Floor Panel: Finally, place another layer of plywood over the insulation and secure it in place.
Step 2: Pre-assembling Cabinets
Materials Needed: Wood panels, screws, and hinges.
- Design the Cabinets: Sketch your cabinet design on paper. Customizing these will help you utilize the space efficiently.
- Cut the Wood Panels: Cut the panels according to the design specs.
- Assemble the Panels: Use screws and hinges to assemble your cabinets. Ensure they are sturdy and well-built.
Step 3: Assembling the Cabin
Materials Needed: Wood panels, screws, and tools.
- Construct the Sides: Begin by attaching the side panels to the floor. Ensure they are level and secure.
- Install the Front and Rear Panels: Attach the front and back panels. These need to perfectly align with the side panels.
- Install the Cabinets: Securely fasten the pre-assembled cabinets inside the structure.
Step 4: Building the Roof
Materials Needed: Wood panels, screws, aluminum sheets, and insulation.
- Build Roof Supports: Install roof joists using wood panels. These will support the roof.
- Install Insulation: Place insulation between the roof supports.
- Secure the Roof Panels: Attach the plywood panels on top of the roof supports.
- Cover with Aluminum Sheets: Fasten aluminum sheets over the plywood to weather-proof your roof.
Step 5: Building the Hatch
Materials Needed: Wood panels, screws, aluminum hinges, and insulation.
- Build the Hatch Frame: Using wood panels, build a frame that fits the rear opening of your cabin.
- Insulate the Hatch: Place insulation within the frame.
- Attach the Outer Layers: Securely fasten the outer plywood layers and cover with aluminum.
- Install the Hurricane Hinge: This will allow your hatch to open and close smoothly.
Step 6: Adding Aluminum Cladding
Materials Needed: Aluminum sheets, screws, edge trim, and T-molding.
- Measure and Cut Aluminum Sheets: Carefully measure and cut to ensure a perfect fit for the sides, front, and back of the trailer.
- Secure Aluminum Sheets: Attach the sheets to the wood using screws. Ensure they are tightly fastened to avoid water seepage.
- Install Edge Trim and T-Molding: These will cover the seams and edges, giving your trailer a finished look.
Additional Tips:
- Electrical Installation: Set up your electrical components like the Battery, Fuse Block, and Master Switch before installing paneling. This makes wiring easier.
- Doors and Windows: Pre-fabricated doors and windows can save a lot of time and effort. I found ones that fit perfectly after some minor adjustments.
- Quality Materials: Use high-quality materials and follow all safety guidelines during the build.
How to Build a DIY Teardrop Trailer: Part 2
Continue your DIY journey with how to build a DIY teardrop trailer: part 2. discover essential steps and tips for a perfect build!
Materials You'll Need
Before diving into the process, having the right materials on hand is crucial. Here are some key items and why they matter:
- Trailer Frame: This is the foundation of your teardrop trailer. I used the Harbor Freight 5x8 Ironton trailer frame but modified it slightly by adding 2-inch spacers, 15-inch wheels, and moving the axle back a few inches to handle rear weight better.
- Aluminum Sheets: For the outer shell because they are lightweight, durable, and weatherproof. I ordered mine from SAF.com.
- Hurricane Hinge: Necessary for building a waterproof seal on the hatch.
- Edge Trim & Offset T-Molding: Provides a clean finish and adds durability.
- Electrical Components: Including a Battle Born Battery, 12V Fuse Block, Master Battery Switch, Reading Light, Vent Fan, and Charging Station. These are essential for the trailer’s electrical system.
- Miscellaneous Items: Mattress, Doors, Side Table Bracket.
Step by Step Instructions
Learn how to build a DIY teardrop trailer in Part 2. Follow our step-by-step guide to continue your trailer project and hit the road!
Step 7: Assembling the Trailer Frame
The first step involves assembling the trailer frame. Follow the manufacturer's instructions meticulously. Make sure all bolts and attachments are secure, as this will ensure your trailer is steady and safe on the road.
My Tip: Importantly, I added spacers and larger wheels for better ground clearance and stability.
Sub-Step: Modifying the Frame
I moved the axle back by a few inches to account for the added weight at the rear. This adjustment helps distribute weight more evenly and improves towing stability.
Step 8: Building the Base
With the trailer frame ready, the next step is to build the base. Use a sturdy material like plywood, which provides a solid foundation for the trailer’s walls and roof.
Materials:
- Plywood Sheets
- Screws and Drill
Step-by-Step:
- Measure the frame and cut plywood sheets accordingly.
- Secure the plywood to the trailer frame using screws.
- Ensure the base is stable and even.
Step 9: Constructing the Walls
Constructing walls requires precision. I made templates using cardboard to ensure the cuts were accurate.
Materials:
- Plywood
- Insulation Material
- Screws and Adhesive
Step-by-Step:
- Mark and cut the plywood sheets to size.
- Add insulation within the walls for better cabin comfort.
- Attach the walls to the base using screws and adhesive.
My Tip: Pre-drill all holes to prevent the plywood from splitting.
Step 10: Adding the Aluminum Exterior
This is where your trailer starts to look professional. Aluminum not only looks great but also protects the trailer from the elements.
Materials:
- Aluminum Sheets
- Aluminum Trim
- Screws and Rivets
Step-by-Step:
- Cut the aluminum sheets to size.
- Attach the sheets to the trailer’s walls and roof using screws.
- Use aluminum trim to cover the edges for a clean look.
Step 11: Installing Doors and Vent Fan
Doors and a vent fan are crucial for ventilation and accessibility.
Materials:
- Pre-made Doors
- Vent Fan Kit
Step-by-Step:
- Cut out door openings in the side walls using a saw.
- Install the pre-made doors into the openings, securing them with screws.
- For the vent fan, cut a hole in the roof and install the fan using the provided kit.
Step 12: Wiring the Electrical System
Wiring is a critical part of the build requiring careful planning to avoid future issues.
Materials:
- Battle Born Battery
- 12V Fuse Block
- Master Battery Switch
- Reading Light
- Vent Fan
- Charging Station
- Electrical Wire
Step-by-Step:
- Plan your wiring layout to ensure all components are correctly interconnected.
- Install the battery and connect it to the main fuse block.
- Wire individual components like the reading light, vent fan, and charging station to the fuse block.
- Test the electrical system to make sure everything works properly.
My Tip*: Use zip ties to keep wires organized and avoid any tangled mess.
Step 13: Building and Installing the Hatch
The hatch is where many people store their kitchen setup or additional gear. It should be sturdy and well-sealed.
Materials:
- Plywood
- Aluminum
- Hurricane Hinge
- Offset T-Molding
Step-by-Step:
- Measure and cut plywood for the hatch.
- Attach aluminum sheets to the exterior of the hatch.
- Use the hurricane hinge to attach the hatch to the main body of the trailer.
- Add offset T-molding for a finished look and waterproofing.
My Tip: Double-check the seal around the hatch to prevent water leakage.
Final Touches
After installing all the major components, it’s time for the finishing touches. Install a mattress for comfort, add any additional features like a side table bracket, and ensure everything is secure.
My Tip: Take the trailer for a short test drive to make sure everything is stable and secure before hitting the open road.
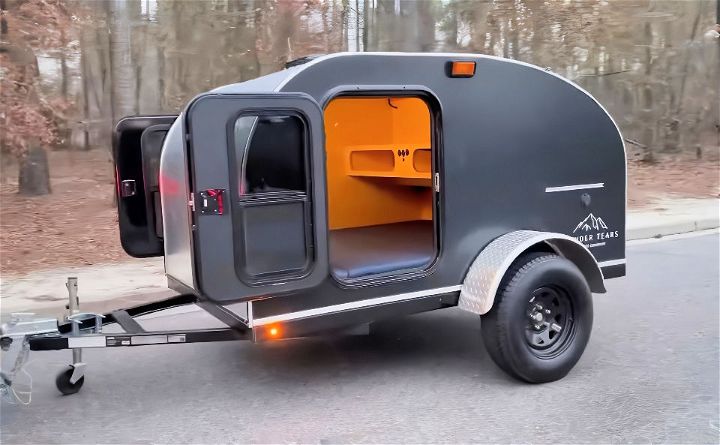
Building a DIY teardrop trailer was a fulfilling project that combined my love for travel and building something with my own hands. It required patience, the right materials, and a bit of ingenuity, but the final result was incredibly rewarding. By following these steps, you too can build your teardrop trailer and embark on new adventures in no time.
FAQs About DIY Teardrop Trailer
Discover answers to common faqs about DIY teardrop trailer builds, including construction tips, costs, and materials. Get started on your own project today!
A DIY teardrop trailer is a small, towable caravan that’s shaped like a teardrop. It’s wider at the front and tapers towards the back. These trailers usually have room for sleeping and a basic kitchenette. They are known for their simplicity, efficiency, and the freedom they offer for travel and adventure.
Begin by planning your design, considering the size and features you want. Set a budget and timeline for your project. Gather the essential materials and tools you’ll need. You can find detailed step-by-step guides online that cover everything from the trailer frame construction to the interior layout and electrical wiring.
Absolutely! You can design your trailer to fit your specific needs. This might include custom storage solutions, unique decor, or additional features like solar panels for off-grid camping. The level of customization is up to you and your skill set.
Building a teardrop trailer can come with challenges such as ensuring structural integrity, waterproofing, and electrical setup. Anticipate these issues by researching and preparing solutions in advance. Joining a community of fellow builders can provide support and advice throughout your build process.
Safety is paramount when constructing a DIY teardrop trailer. Always wear protective gear like gloves and goggles when working. Follow guidelines for tool use and trailer assembly to prevent accidents. Ensure all electrical work complies with safety standards to avoid fire hazards. Regularly inspect your work for structural integrity, especially the trailer hitch and wheels, to ensure road safety.
Conclusion:
In conclusion, building a DIY teardrop trailer can be a fun and rewarding project. You'll save money, customize your trailer to your liking, and enjoy the satisfaction of building something with your own hands. From planning and sourcing materials to the final assembly, every step of the process offers an opportunity to learn and grow your skills. So, take the plunge and start your DIY teardrop trailer project today!

