Learn how to paint clay pots with our easy step-by-step guide. Painting clay pots can be a fun and creative activity. First, gather your materials: unglazed clay pots, acrylic paint, brushes, and a sealer. Start by cleaning the clay pot to remove any dirt or residue. Apply a base coat of paint and let it dry completely. This base coat helps the colors stand out and prevents the clay from soaking up the paint.
Once the base coat is dry, use different brushes and colors to create your designs. You can draw patterns, flowers, or abstract art. After your painting is finished and completely dry, apply a clear sealer to protect your work. This makes the clay pot more durable and weather-resistant. Ready to get started? Next, discover detailed steps and tips for painting clay pots like a pro!
Materials Needed
Before we start, it’s crucial to gather all necessary materials:
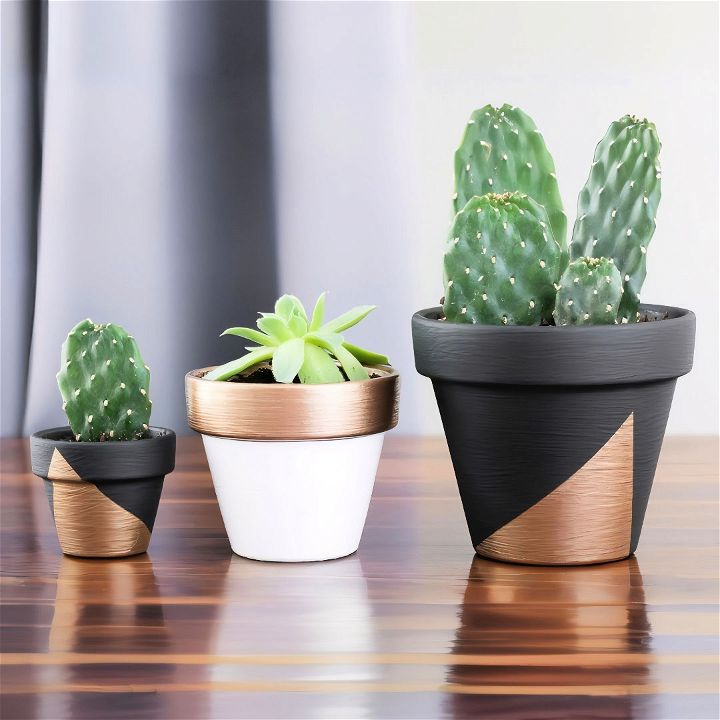
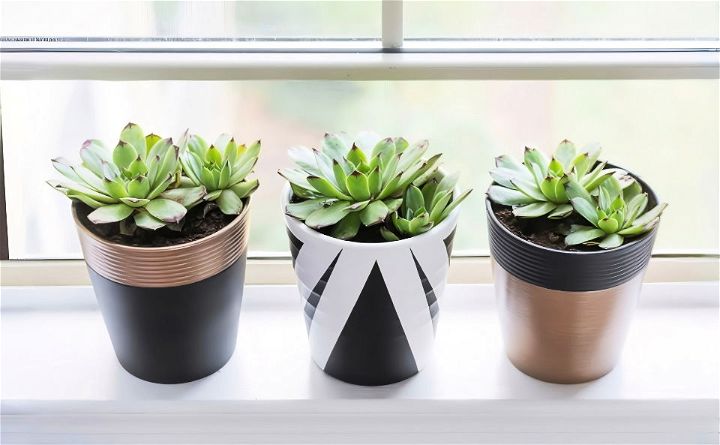
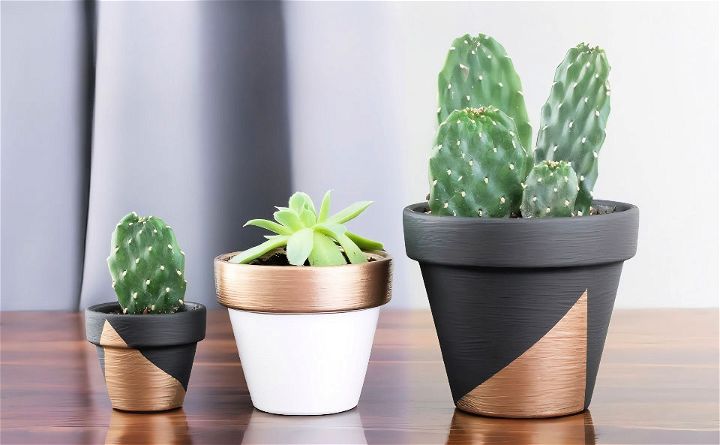
- Terracotta Clay Pots: The star of the project. These pots are popular for their built-in drainage and excellent moisture retention due to their porous nature.
- Acrylic Craft Paint or Spray Paint: Acrylic paint is easy to use and offers a variety of colors. Spray paint is more durable for outdoor use.
- Thompson’s WaterSeal Aerosol Spray: Important for sealing the terracotta, which helps in preventing moisture from affecting the paint, thereby extending its life.
- Paint Brushes: Various sizes to accommodate detailed work and larger surface areas.
- Gloves: Keeps your hands clean and free from paint.
- Paper Towels or Old Newspapers: To protect your workspace.
Step-by-Step Guide
Discover the ultimate step-by-step guide on how to paint clay pots for stunning, personalized garden decor.
Step 1: Preparing Your Workspace
First things first, find a well-ventilated space to work in, preferably outdoors or in a garage with the doors open. Cover your workspace with old newspapers or a large drop cloth to protect it from paint splatters.
Step 2: Cleaning the Pots
Before you begin painting, make sure your terracotta pots are clean. Wipe away any dust or soil with a damp cloth. This ensures that the paint adheres properly and lasts longer.
Step 3: Sealing the Terracotta Pots
Terracotta is naturally porous, which allows it to manage moisture levels beautifully—an excellent feature for your plants. However, this porosity also means that moisture can seep underneath the paint, leading to bubbling and chipping. To avoid this, apply a coat of Thompson's WaterSeal Aerosol Spray. Hold the spray can about 6-8 inches away from the pot and apply it in an even coat. Let it dry completely before moving on to the next step.
Step 4: Choosing the Paint
Now it's time to decide whether you'll use acrylic craft paint or spray paint. Both have their merits.
- Acrylic Craft Paint: Ideal for indoor pots. It’s cost-effective and comes in a broad range of colors.
- Spray Paint: Perfect for outdoor pots as it withstands exposure to the elements better.
Step 5: Applying the Base Coat
Using Acrylic Craft Paint
- Mix and Pour: Pour a small amount of acrylic paint onto a palette or paper plate.
- Base Layer: Using a broad paintbrush, apply a thin, even base coat over the entire surface of the pot. Hold the pot by its lip and apply the paint in a circular motion, covering the base first and then working up the sides.
- Dry Time: Allow the first coat to dry completely before applying a second coat. This usually takes around 1 hour.
- Second Coat: Apply a second coat of paint for uniform coverage and to make the color pop. Allow it to dry completely.
Using Spray Paint
- Shake Well: Shake the spray paint can vigorously for a minute.
- First Coat: Spray an even, light coat over the pot from about 8-10 inches away. Move the can in sweeping motions to avoid drips.
- Dry Time: Allow the first coat to dry for about 30 minutes to 1 hour.
- Second Coat: Apply a second coat to ensure full coverage. Let it dry completely.
Step 6: Detailing and Finishing
For an added touch, consider painting designs or using stencils. Use finer brushes for intricate detailing. Once your design work is complete, let it dry thoroughly.
Step 7: Sealing the Paint (Optional)
Even though some acrylic paints come with a built-in sealer, consider adding an extra layer of protection, especially for outdoor pots. A final coat of clear spray sealant can help protect your design against chipping and fading.
Step 8: Preparing for Planting
Once the sealant is dry, your terracotta pots are ready to become beautiful homes for your plants. No need to paint the interior since it will be filled with soil, which will naturally hide any unpainted areas.
And there you have it! Painting terracotta pots using acrylic or spray paint can be an incredibly rewarding and simple DIY project. Whether you’re looking to spruce up your indoor space or your garden, these painted pots make for a visually appealing and personalized touch.
If you enjoyed this guide and want more DIY tips, don't forget to check out my blog for more plant care and home decor ideas. Now, go ahead and get creative—your plants are about to get some stylish new homes!
FAQs About DIY Clay Pot Painting Ideas
Explore faqs about DIY clay pot painting ideas for creative inspiration, essential tips, and common questions answered. Get started on your project today!
To begin painting clay pots, you’ll need some basic supplies: terracotta pots, acrylic paints, paintbrushes, a clear sealant, and your creativity. Make sure the pots are clean and dry before you start.
Absolutely! Just clean the pot thoroughly, removing any dirt or debris. Let it dry completely. You may want to apply a base coat of paint to ensure a fresh canvas for your new design.
Yes, there are plenty of simple designs that are perfect for beginners. Consider trying solid colors with stripes, polka dots, or even simple geometric patterns. You can also use stencils or painters tape to create clean lines and shapes.
Once your paint has dried, apply a clear sealant to protect your design from water and UV rays. This will help keep the colors vibrant and prevent the paint from peeling or fading.
Inspiration is everywhere! You can look at nature, fabric patterns, or even artwork. Online platforms like Pinterest and Instagram offer tutorials and step-by-step guides for various designs. Websites dedicated to crafts can also provide a wealth of ideas and instructions.
Conclusion:
Wrapping up, learning how to paint clay pots can be a fulfilling and enjoyable experience. With the right materials, creativity, and a bit of practice, you can transform simple clay pots into beautiful decorative pieces. Painting clay pots is not only a fun hobby but also a great way to personalize your garden or home decor. By following the steps in this guide, you’ll be able to create unique and eye-catching pots that reflect your personal style.
Related posts: