Adding a pond to your yard can transform it into a serene oasis. Building a pond is a rewarding project that can enhance your outdoor space and create a habitat for wildlife. In this guide, we will walk you through the steps to learn how to build a pond. From selecting the perfect spot to adding plants and fish, you'll find all the essential tips and techniques to get started.
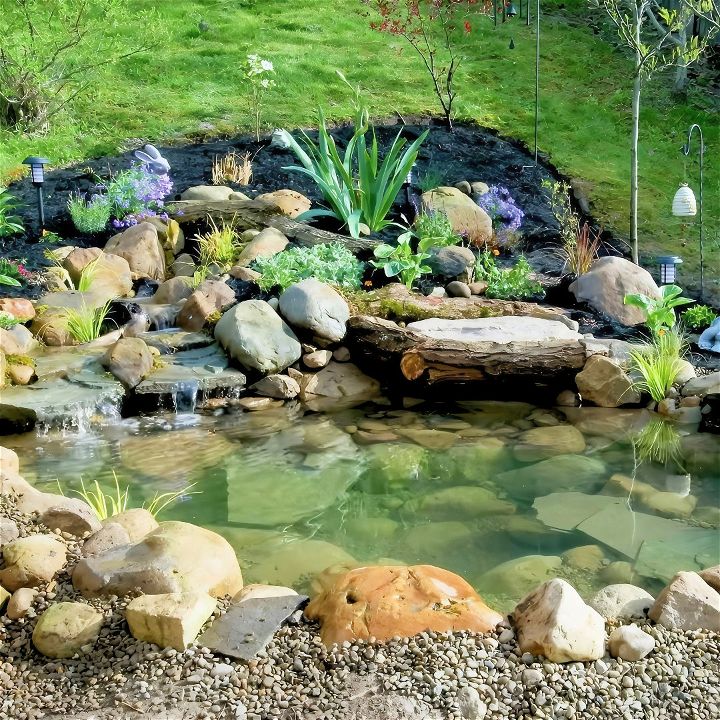
By following our instructions, you can create a stunning pond that suits your yard's size and layout. We will cover important aspects like excavation, lining, and maintenance to ensure your pond remains beautiful and functional for years. With our easy-to-follow steps, you'll be well-prepared to tackle this exciting project.
Step by Step Instructions
Learn how to build a pond with step-by-step instructions. From dismantling the old pond to final landscaping, our guide covers everything you need.
Day 1: Dismantling the Old Pond
Materials Needed:
- Net: To safely catch and transport the fish.
- Pickaxe and Shovel: For breaking up and removing clay and soil.
- Geotextile Fabric and EPDM Liner: To protect and line the pond.
- Boulders and Stones: Essential for structural stability and natural aesthetics.
- Trash Can: Used for filtration system.
- Expanding Foam: To optimize water flow in the waterfall.
Why These Materials?
The net ensures the safety of the fish during the relocation process. The pickaxe and shovel are crucial for breaking up the clay soil and shaping the pond. Geotextile fabric and EPDM liner prevent leaks and protect the pond from sharp objects. Boulders and stones provide a natural look and structural support. The trash can serves as a cost-effective filtration system, and expanding foam helps divert water efficiently.
Process:
- Relocate Fish: I started by netting the fish and temporarily relocating them to a safe environment at my house.
- Remove Boulders and Plants: Next, I removed the boulders, aquatic plants, and gravel, carefully setting them aside for later use.
- Excavate the Pond: I expanded the pond using a pickaxe and shovel, focusing on maintaining the original shape but making it larger.
- Prepare the Basin: I lined the enlarged hole with geotextile fabric and then rolled out an EPDM liner over it, ensuring it conformed to the basin’s shape.
Day 2: Laying the Foundation
Materials Needed:
- EPDM Liner and Geotextile Fabric Overlap: For lining the waterfall.
- Assortment of Boulders and Gravel: For creating a stable base.
Process:
- Create Pond Shelves: I carved out shelves in the pond, which are crucial for stacking stones and creating varying depths.
- Line the Pond: I lined the entire basin with geotextile fabric and then rolled the EPDM liner over it.
- Position Boulders: Using flat-surfaced boulders, I laid the bottom layer to provide stability.
- Install Filtration System: I placed the trash can in its designated hole, framing it with large stones and filling the gaps with smaller stones and gravel.
Day 3: Developing the Waterfall
Materials Needed:
- 20-Gallon Stock Tub: To create a reservoir at the top of the waterfall.
- Drill and Utility Blade: For making necessary cuts and holes.
- Spillway Foam and Stones: To secure the spillway and ensure smooth water flow.
Process:
- Excavate for Reservoir: I dug a hole to fit the stock tub, ensuring it aligned well with the waterfall’s start point.
- Prepare the Spillway: Using a utility blade, I cut the stock tub to create an opening for the waterfall and attached tubing for the pump.
- Position Stones: I arranged flat stones to form the base of the waterfall, ensuring they were level.
- Seal with Foam: I used expanding foam to seal gaps and direct water flow over the rocks. Gravel and moss were used to conceal the foam.
Day 4: Enhancing the Environment
Materials Needed:
- Logs and Driftwood: To add interest and natural aesthetics.
- Additional Boulders and Soil: For building up the pond edges and enhancing stability.
- Plants and Mulch: To landscape around the pond.
Process:
- Add Logs and Driftwood: Incorporating natural elements like oak branches and driftwood made the pond visually intriguing.
- Build Up Edges: Using excess soil and more boulders, I built up the pond’s edges, adding height and depth.
- Install Flat Stones: These served as hiding spots for the fish and further stabilized the structure.
- Secure Everything: I used additional expanding foam and stones to secure all structural components.
Day 5: Final Touches and Landscaping
Materials Needed:
- Mesh Media Bag and Lava Rock: For additional filtration.
- Perennial Plants: To soften the pond edges and add greenery.
- Mulch and Fauna Fencing: To tidy up the surrounding landscape.
Process:
- Install Filtration Media: I filled a mesh bag with lava rocks, rinsed thoroughly, and placed it in the stock tub for added filtration.
- Add Plants: Planted aquatic and edge plants around the pond to enhance its natural look.
- Landscape Edges: Spread mulch and added edging to retain soil and create a neat appearance.
- Test and Final Cleaning: Turned on the pump to test the waterfall and made sure there were no leaks. Cleaned debris and ensured everything was functioning well.
Budget and Tips for Saving
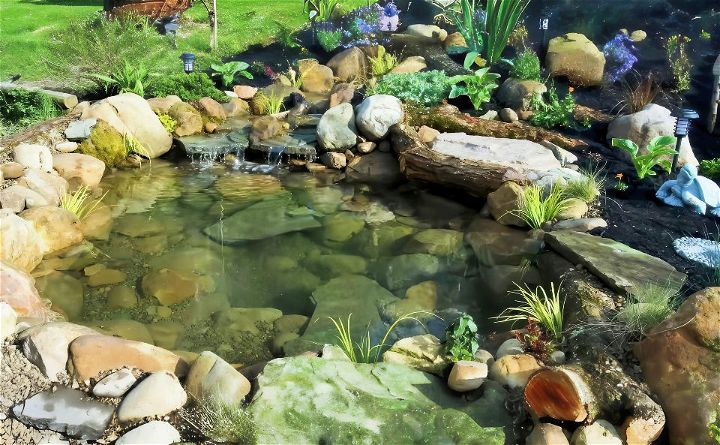
While building a pond of this scale is an investment, there are ways to keep costs manageable. For instance, opting for regular expanding foam instead of specialized pond foam can save a lot, and using found objects like stones and branches cuts expenditure on decorative elements. Checking for plant clearance sales can yield significant savings, as can the careful selection of a durable liner.
FAQs About DIY Pond
Discover everything you need to know about DIY ponds with our comprehensive faqs covering installation, maintenance, and expert tips.
Select a location on flat ground with minimal slope. If you plan to add powered features, ensure it’s near an electrical outlet. The spot should receive at least 6 hours of sunlight daily and have enough workspace around it. Avoid placing your pond too close to trees to minimize debris and potential root damage.
For a low-maintenance pond, choose a durable 45-mil-thick EPDM rubber liner. Protect the liner with an underlayment to guard against sharp stones and roots. Plan your pond to keep runoff water out and make it easy to empty. Use tough tubing for plumbing to avoid frequent replacements.
Yes, building a DIY pond is an easy project for all skill levels. There are step-by-step guides available that can help you through the process, from choosing the location to installing the pump and filter. Just follow the instructions carefully and take your time to ensure a successful build.
Regular maintenance tips include removing debris like leaves and sticks, checking the pump and filter for proper operation, and monitoring water levels. Additionally, consider adding beneficial bacteria to maintain water clarity and aquatic plants to provide shade and reduce algae growth.
Introducing fish to your DIY pond requires a few careful steps. First, acclimate your fish by floating their transport bag in the pond water for about 15 minutes to equalize the temperature. Then, gradually mix pond water into the bag over the next 15 minutes before releasing the fish. Choose fish that are suitable for ponds, such as koi or goldfish, and ensure your pond has adequate filtration and aeration to maintain water quality. Feed them high-quality pond-specific fish food and monitor their health regularly.
Conclusion:
In conclusion, learning how to build a pond is a fulfilling project that can enhance your outdoor space. By following the steps outlined, from planning to finishing touches, you can create a beautiful and functional pond. Enjoy the tranquil ambiance and the joy of watching it evolve. Start your pond-building adventure today!
Related DIY Projects and Ideas:
Discover a wide range of DIY projects and ideas to inspire your next home improvement or craft project. Get creative with step-by-step guides!
- DIY Pergola to Build Your Dream Space: Transform your backyard with these DIY pergola. Create a stunning outdoor space with easy-to-follow instructions.
- Building a DIY Deck: Design your outdoor oasis with this free DIY deck plan. Follow step-by-step instructions for a perfect addition to your home.
- Easy DIY Flagpole: Show your pride with a custom flagpole. Follow this easy DIY flagpole plan to create a sturdy and stylish display.
- Simple DIY Outdoor Bench: Enhance your garden with a handmade bench using this simple DIY outdoor bench plan. Perfect for relaxing outdoors.
- How to Build a DIY Birdhouse: Attract birds to your garden with this easy DIY birdhouse plan. Create a cozy home for your feathered friends.

