Making a DIY chicken feeder is a practical and rewarding project that benefits both you and your chickens. You can make a reliable feeder from readily accessible materials, ensuring your chickens have a steady food supply. This guide will walk you through simple steps to build your own chicken feeder using common tools and supplies. This project is cost-effective and can be completed in a short time, making it suitable for anyone wanting to provide for their backyard hens.
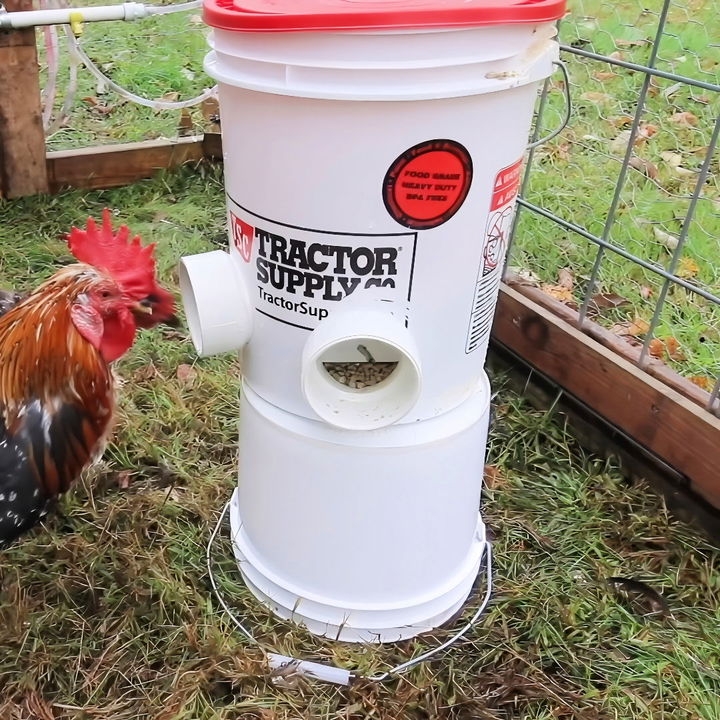
By making your own feeder, you can customize it to fit your specific needs and space. The benefits include reducing food waste and keeping the feed clean from contaminants. Follow this clear and straightforward guide, and you’ll soon have a functional feeder that improves your coop's efficiency. Continue reading to discover the detailed instructions and tips for crafting your DIY chicken feeder.
Materials You'll Need
Here's the list of materials you'll need for this project:
- 5-Gallon Bucket with Lid: This bucket will serve as the main container for the chicken feed. Make sure it's food-grade and BPA-free for the safety of your chickens.
- 3-Inch 90-Degree PVC Elbow: The elbow piece helps control the flow of the feed and reduces wastage.
- Packing Tape: Used to secure the PVC fittings and prevent spillage when the bucket is moved.
- Drill: Necessary for making holes in the bucket.
- 3/16-Inch Drill Bit: For creating smaller holes to secure the fittings.
- Tape Measure: To ensure precise measurements.
- Sharpie: For marking drilling spots.
- Razor Knife: Handy for cutting and making adjustments.
- File: To smoothen out the cut edges of the bucket.
- 3.5-Inch Hole Saw Bit: Used for creating larger holes for the PVC fittings.
- Pop Rivets and Rivet Tool: To secure the PVC elbows in place.
Optional but recommended: A cup of coffee to keep you energized!
Step by Step Instructions
Learn how to make a DIY chicken feeder in 11 simple steps, from prepping your workspace to final assembly and testing.
Step 1: Prepare Your Workspace
Before you start, make sure you have a clean and organized workspace. Gather all your materials and tools. If you're working on a table, place a piece of wood underneath the bucket to protect the surface while drilling.
Step 2: Measure and Mark the Bucket
Using your tape measure and Sharpie, mark a spot 4 inches up from the bottom of the bucket. This is where you'll drill the holes for the PVC elbows. If you're using a Tractor Supply bucket, the 4-inch mark is conveniently right at the bottom of their label.
Next, mark a spot 6 inches apart from this first mark. These two marks will serve as the placement for your PVC elbows.
Step 3: Drill the Holes
Attach the 3.5-inch hole saw bit to your drill. Position the drill on the first mark and carefully drill through the bucket. Make sure to save the cutout pieces, as we'll need them later. Repeat the process for the second mark.
Step 4: Smooth the Edges
After drilling, you might find rough edges around the holes. Use the file to smooth them out. This will make it easier to insert the PVC elbows and ensure a snug fit.
Step 5: Insert the PVC Elbows
Take your two 3-inch 90-degree PVC elbows and insert them into the drilled holes, making sure they point downwards. Temporarily secure them in place to check the alignment.
Step 6: Mark and Drill Smaller Holes
With the PVC elbows in place, use the Sharpie to mark a spot on the center ridge of the elbow where it touches the bucket. This is where you'll drill a 3/16-inch hole for the pop rivets. Carefully drill the holes on both sides.
Step 7: Secure the Elbows with Pop Rivets
Take the pop rivets and use the rivet tool to secure the PVC elbows in place. Flatten one side of the rivet with pliers to ensure a tight fit. This step is crucial for preventing any movement or dislodging of the elbows.
Step 8: Prepare the Cutout Pieces
Remember the circular cutouts you saved from Step 3? Now, it's time to use them. Cut a quarter section out of each cutout piece using a razor knife. These pieces will act as plugs to prevent feed spillage when the bucket is moved.
Step 9: Secure the Plugs
Use packing tape to secure the cutout pieces (plugs) onto the inner side of the PVC elbows. This step ensures that when you lift or move the bucket, the feed doesn't spill out through the elbows. Make sure the tape holds the plugs firmly in place.
Step 10: Final Assembly
Install the assembled bucket with its PVC fittings onto the seat brackets that you have in your chicken coop. These brackets should be at a height that allows your chickens to reach the feed comfortably.
Step 11: Test and Adjust
After assembly, fill the bucket with chicken feed and observe how it dispenses through the PVC elbows. Make any necessary adjustments to ensure a smooth flow of feed.
Additional Tips
- Cleaning: The pop rivets allow you to easily remove the PVC elbows for cleaning.
- Baby Chicks: For smaller chicks, you might need an additional lower feeder until they grow taller.
- Safety: Ensure no sharp edges are left on any of the parts to avoid injuring your chickens.
Building a DIY automatic chicken feeder using a 5-gallon bucket is not only cost-effective but also fairly simple. It takes a bit of time and effort, but the payoff is a hassle-free feeding system that ensures your chickens always have access to food. Plus, it's a fun and rewarding project that adds to your homesteading skills.
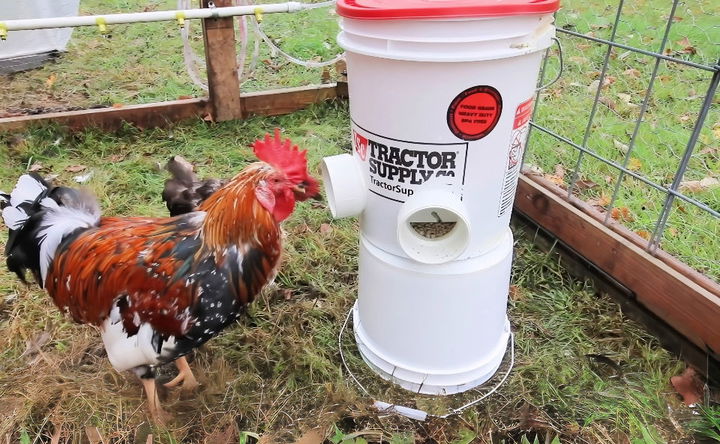
FAQs About DIY Chicken Feeder
Discover faqs about DIY chicken feeder: learn how to build, maintain, and troubleshoot your homemade chicken feeder for efficient poultry care.
To make a no-waste chicken feeder, consider a design that minimizes spillage. This could involve using feeders with a lip or barrier that prevents chickens from flicking feed out. PVC pipe feeders are popular as they can be designed to allow only the chicken’s head inside, thus reducing waste.
The size of your chicken feeder will depend on the number of chickens you have. Each chicken requires about 2 inches of feeding space and roughly ¾ cup of feed per day. Your feeder should be large enough to hold a day’s worth of feed for all your chickens but not so large that the feed spoils before it’s consumed.
Indoor feeders protect the feed from the elements, keeping it dry and mold-free. However, they can take up valuable space inside the coop. Outdoor feeders encourage chickens to spend more time outside, which is healthier for them, but they need to be designed to prevent feed from getting wet.
To keep pests like rats and mice away, ensure your feeder is elevated off the ground and has a design that restricts access to the feed. Using materials like PVC can help create a smooth surface that pests find difficult to climb. Additionally, make sure to clean the feeder regularly to avoid attracting pests with leftover feed.
To ensure your chicken feeder withstands outdoor conditions, consider using materials like PVC or repurposed food-grade barrels which are durable and water-resistant. If you’re placing the feeder outside, add a roof or cover to protect the feed from rain. For PVC pipe feeders, ensure all joints are sealed properly to prevent water ingress. It’s also a good idea to position the feeder under a shelter or inside the coop’s run where it has some natural protection from the elements.
Conclusion:
In conclusion, making your own DIY chicken feeder is a simple and rewarding project. It saves money while providing convenience and sustainability for your flock. This guide has covered the essential steps, materials, and tips, ensuring you can build an efficient feeder. Enjoy your improved chicken-keeping experience.
Related DIY Projects and Ideas:
Get inspired with our Related DIY Projects and Ideas! Discover step-by-step guides and creative tips for home improvements and crafts.
- DIY Cat Bed: Make a cozy cat bed with these simple DIY projects. Perfect for any feline!
- DIY Gun Rack: Follow this step-by-step guide to build your own gun rack. Secure and stylish storage!
- DIY Hat Rack: Organize your hats with these DIY hat rack instructions. Stylish and functional!
- DIY Ballet Barre: Create a professional ballet barre at home with these DIY ideas for aspiring dancers. Easy and affordable!
- DIY Disc Golf Basket: Build your own disc golf basket with these DIY ideas. Fun and practical!

