Making a simple DIY bed frame on a budget is easier than you might think. With some basic materials and a few tools, you can have a sturdy bed frame that suits your style without spending a fortune. This guide will walk you through the steps, from gathering materials to final assembly, ensuring you have a clear understanding of the process.
Building your own DIY bed frame not only saves money but also offers a sense of accomplishment. This project is designed to be straightforward, with detailed instructions that are easy to follow. Ready to get started? The next section will list the materials and tools you'll need to bring your simple bed frame to life.
Materials You'll Need
- Three 2x6 Boards (8 feet long): These form the primary structure of the bed frame. They're sturdy enough to support the weight of the mattress and the person sleeping on it.
- Two 2x3 Boards (8 feet long): These will support the slats that hold the mattress.
- Slatted Bed Base Kit (from Ikea): This was cheaper and more practical than using individual wooden slats.
- Wood Stain: Choose a color that matches your room's decor. I opted for a charcoal interior stain and varnish, which provided a sleek, modern finish.
- 2.5-inch Construction Screws: Essential for securing the 2x3 supports to the frame.
- 3.5-inch Structural Wood Screws (Black): These add a pleasant aesthetic touch while securing the main frame.
- Corner Clamps: While optional, they ensure perfect alignment when joining the wood pieces.
- Self-Centering Drill Bit: Useful for attaching the legs accurately.
- Palm Sander and Sanding Sponge: For smoothing out the wood, ensuring no rough edges or splinters.
- Black Metal Legs: Purchased from Amazon, these provide sturdy support for the bed frame.
Step by Step Instructions DIY Bed Frame
Step by Step Instructions
Build a budget-friendly DIY bed frame with our simple, step-by-step instructions. Perfect for beginners looking to save money.
Step 1: Cutting the Wood
I started by cutting the wood to the right lengths. Here's what you'll need to cut:
- Two pieces of 2x6 at 75 inches for the sides.
- Two pieces of 2x6 at 42 inches for the ends.
- Two pieces of 2x3 at 75 inches for the slat supports.
Using a circular saw, I made sure to cut off any damaged parts of the wood. If you're on a budget, you can use cheaper tools – the results will be the same.
Step 2: Assembling the Frame
Preparing the Pieces
First, I drilled pilot holes in each end of the 42-inch 2x6 pieces. This step is crucial as it prevents the wood from splitting when you drive in the screws. Mark each end ¾ of an inch from the edge for precision drilling.
Assembling the Corners
Using corner clamps, I aligned the 42-inch pieces with the 75-inch pieces. The clamps help keep everything straight and steady. I then drilled pilot holes into the 75-inch pieces using the holes in the 42-inch pieces as guides.
Secure the corners with the 3.5-inch black structural wood screws. Repeat this for all four corners to complete the rectangular frame.
Step 3: Sanding and Staining
Sanding
Once the frame was assembled, I sanded all the surfaces using a palm sander for flat areas and a sanding sponge for the corners and edges. This step ensures a smooth, professional-looking finish and removes any potential splinters.
Staining
Next, I applied two coats of charcoal stain and varnish. Allow each coat to dry thoroughly before applying the next. The stain not only adds color but also protects the wood.
Step 4: Installing the Slat Supports
Using the 2.5-inch construction screws, I attached the two 2x3 pieces inside the long sides of the frame. These pieces will hold the slats. Like before, I drilled pilot holes first to prevent the wood from splitting.
Step 5: Attaching the Legs
The black metal legs were easy to install. Using a self-centering drill bit, I drilled pilot holes and then secured the legs with screws. The self-centering bit ensures that the screws are perfectly aligned, preventing any wobbling.
Step 6: Adding the Slats
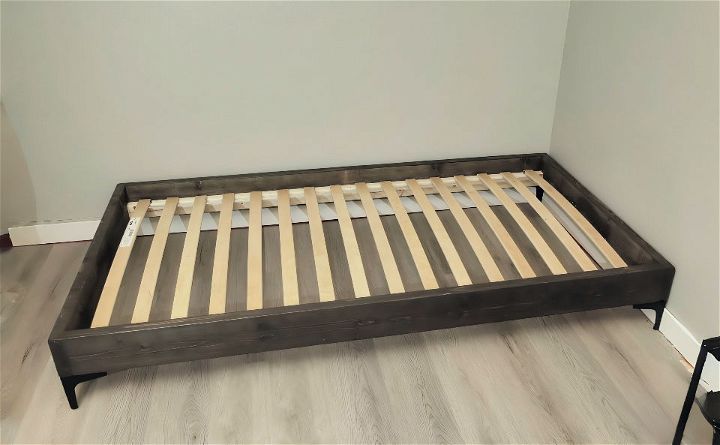
I bought a slatted bed base kit from Ikea. The slats come with a strap to keep them evenly spaced. To prevent them from shifting, I added two screws at each end of the slats, securing them to the 2x3 supports.
Final Touches and Assembly
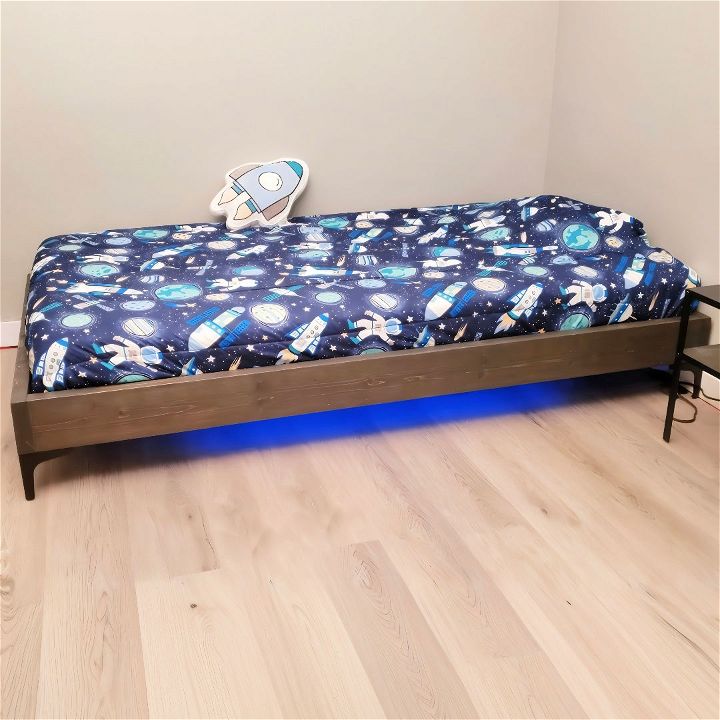
Finally, I added an RGB LED strip under the frame for a modern touch. It’s a simple addition but it gives the bed a unique and stylish look. After placing the mattress and bed sheets, my budget-friendly bed frame was complete.
Building this bed frame was a rewarding experience. It’s a straightforward project that can be done over a weekend with basic tools and materials. Not only does it save money, but it also adds a personal touch to your bedroom.
FAQs About DIY Bed Frame
Discover answers to common faqs about DIY bed frame, including materials, tools, and step-by-step guidance for building your own bed frame.
Yes, there are many simple bed frame designs that are perfect for beginners. These usually require basic tools and have straightforward instructions. Start with a simple platform bed or a basic frame with hairpin legs for a modern look.
Consider the style of your bedroom, the size of your mattress, and your storage needs. There are various types of bed frames such as platform beds, storage beds, and traditional frames. Look for a design that fits your aesthetic and functional requirements.
The time it takes to build a DIY bed frame can vary from a few hours to a weekend project, depending on the complexity of the design and your skill level. Simple frames can be built quickly, while more intricate designs with storage or unique materials may take longer.
For most bed frames, you’ll need basic tools like a saw, drill, screwdriver, hammer, and measuring tape. Some designs may require more advanced tools like a router or welder, especially if you’re working with metal legs or detailed woodwork.
To ensure your DIY bed frame is sturdy and safe, make sure to use quality materials and follow the dimensions and instructions precisely. Reinforce joints with metal brackets or additional screws if necessary. Regularly check for any loose parts and tighten them as needed. It’s also important to distribute weight evenly across the frame to prevent any undue stress on certain areas.
Conclusion:
Wrapping up, building a simple DIY bed frame on a budget is achievable and satisfying. By following the steps outlined, you can build a sturdy and stylish bed frame without spending a lot. Enjoy your new bed frame and the sense of accomplishment that comes with making it yourself.
Related DIY Projects and Ideas:
Get inspired with related DIY projects and ideas: discover creative, budget-friendly projects and tips to enhance your home.
- DIY Changing Table: Build a functional and stylish changing table with these easy plans. Perfect for new parents.
- DIY Coffee Bar: Build your own coffee bar with these easy ideas for beginners. Create a cozy DIY coffee corner at home.
- DIY Console Table: Maximize space and style with these unique DIY console table plans. Perfect for any entryway.
- DIY Upholstered Headboard: Upgrade your bedroom with an elegant DIY upholstered headboard. Easy steps for a stylish and comfy addition.
- DIY Floor Lamp: Personalize your space with a stylish DIY floor lamp. Simple steps for a unique lighting solution.

